
Miniature monday – Skeletons

Skeletons are a staple monster for generations of DMs and gaming groups, let’s have a look how our painters envisioned them!
(posting by Antonia)
We painted different skeletons in fact, both the armoured ones and the “bare bone” version. I like painting skeletons, because the bones normally give a nice structure for washing and drybrushing. The armour and clothes give additional layers, and although the models are not too detailed overall, the minis look great (if a bit like from a Harryhausen movie, maybe) and were fun to paint.
Dirks undead followed a calling:
At first he had planned to paint them quick and simple as generic undead, then he got the idea of a vampire who could have summoned them as their underlings so he used the (still unknown to me) vampire’s color scheme on them, which gives the whole project a nice coherent feel.
He said he likes the armored archer best, concerning pose and design – which of those was (or were) your favorite, dear readers?
Dirk also has a tip for our fellow painters: He had the pile of skeletons ready next to his painting station so every time he had some white or ivory paints left over he used it to prepare his undead. That way they were nearly done when he started!
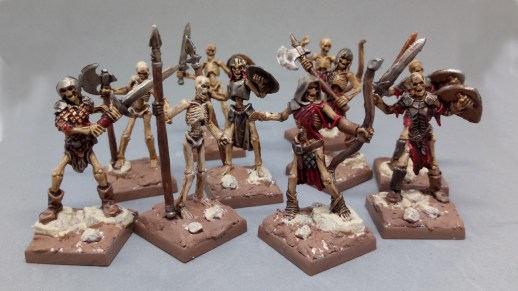
I took not one, but three different approaches this time:

Some of the un-armoured skeletons were just primed with ivory white, washed and then spattered with blood effect paint (in this case Army Painter’s ‘Glistening Blood’. I painted the skeletal abomination that way some time ago and thought it would be interesting to try the effect on normal skeletons. Maybe they are summoned in a way that makes blood drip out of their joints all the time? Scary idea, I think!
The armoured skeletons I painted in bone white plus greens and browns and gave them a wash mixed from browns and greens to make them look like they have been lying in swamp or plant matter for a long time. I like the effect and am glad that I chose bronze for the metal parts because it works well with the green.

The last one was more of a fun idea: Because I thought the helmet looked like sci-fi military gear, I cut off the original weapon and gave it a left over sci-fi rifle (Dirk says it’s from the classic Mutant Chronicles tabletop game). The scale male looks surprisingly fitting in camo green as well – I have no idea yet where to use the mini, but since we both DM a lot of gaming groups we’ll find a way *evilgrin*
And yes, after taking the picture I realized the green wash makes it look a bit like Skeletor… or is that just me?
Michael did some color studies:

He wrote: “Here are my skeletons for this week’s article. I actually have three different paints with the word “Bone” in the name, so I decided to use them all. I painted one set – those without any clothes or armor – with Skeleton Bone. These work best for quick raised/summoned skeletons from your everyday necromancer.”
“The group with armor was done with Aged Bone; I picture these as ancient tomb guardians.”

“Finally, the monstrous thing (boneglomeration? bone swarm?) was done with my old standby, Yellowed Bone (which is super great at lightening reds, oranges, yellows, browns, greens, and purples as well). All of the Bone colors were drybrushed over Walnut Brown.”
Great idea with the comparison, this might be very helpful for our readers and all the upcoming necromancers out there!
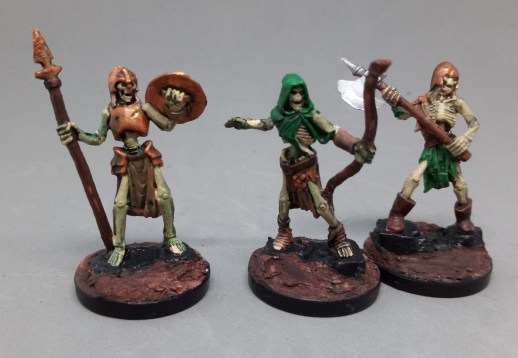
Arjen is interested in painting input, for example:

He said “I speedpainted these undead, then did some slower work to impove them. They are playable, but I am not quite happy. Although I used washes, the ribcage and spine details do not always pop out, arrmor looks dull, rather then old….let’s see if one of the other participants gives me some idea for a makeover.”
We are experimenting with a citadel wash called “Nuln Oil gloss” which is supposed to give metal the shading without the dull surface, so that could be worth looking into – but maybe you could replicate the effect by mixing dark wash and gloss varnish too!
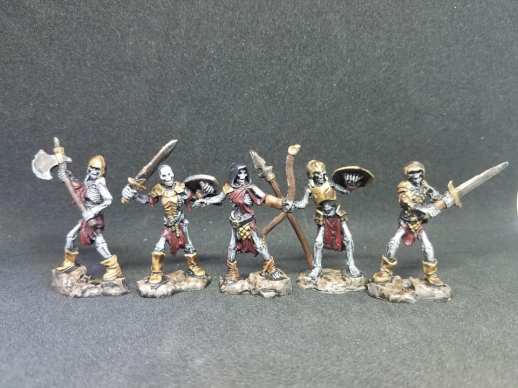
Jim sent in a whole horde. He was a bit late, but as you see it was still in time:

And some detail on the shields too:

He said “I barely finished the undead horde, even though the ghasts are not completely based. Included are the 9 skeletons, 4 mummies, 4 ghasts and three old bones skeletons from before the first Kickstarter. I’m pleased with the skeletons and mummies and only slightly less with the ghasts (they actually look better in the pic than in real life!)”
Good job so far! The ghasts do in fact like they were carefully painted in a pale fleshy tone, how do they look in real life? I like how you, too, varied the skeleton base color (Skeletor ftw!) and the brightly colored shields are a nice eyecatcher within the monochromous horde. The crests on the other shields are great, did you paint them as freehands? They look very medieval!
This week’s gallery:


Coming next:
09/03/18 Bones III Ogres (guard, smasher and/or clubber) (B3 Core)
(I added some of your suggestions already, I might shuffle them around a bit, but keep them coming! For some minis there are no pics in the online shop yet so I’ll add them later.
As you can see I prepared a lot of date entries but am still looking for mini ideas. Post your suggestions if you like! The ‘Type of mini’ placeholder is just that, if you want something else tell us!)
09/17/18 Ostarzha, Elf Cleric (B3 Core)
10/01/18 Bones III Bregan, Valkyrie (B3 Core)
10/15/18 Bones II TBA
10/29/18 Bones III Hobageddon: Hobgoblin warriors (B3 Core)
11/12/18 Bones III Elven Blacksmith (B3 Core)
11/26/18 Bones II TBA
12/10/18 Bones III Animal/Monster TBA
12/24/18 Christmas break
12/31/18 New Year’s break
01/07/19 Bones III Humanoid TBA
01/21/19 Room for your suggestions!

You can never have too many skeletons! Antonia mentions Harryhausen skeletons and I agree with that assessment. That is my preference for skeletons so it is probably no surprise that my favorite of the bunch is the unarmored one with the sword and round shield!
Dirk’s unified color scheme came out well. They still look good and Un-dead, too!
Antonia – The bloody skeletons look properly horrifying, the swampy ones look like they must stink but I love Skeletor with the gun! That works surprisingly well.
All of Michael’s look and each technique seems to work well. Maybe it’s just me but the differences are hard to pick up on but I think that’s just because the internet has a way of affecting pictures. I especially like the way the tomb guardians came out.
Arjen – They look fine for table top use. Good color selection (like yours) goes a long way towards a good result. There are many ways to paint skeletons and none are right or wrong, you just have to find one that works for you. I’ll leave another comment describing how I do mine, which may or may not be of interest to you.
I tried to get at least a little variation on my bone color as well as trying to get some good rust effects. What does everyone think? (be honest) I think I mis-painted a few parts here and there but they’re hardly noticable now. The shield designs are actually decals, but after I applied them I stipled/dry brushed a little base color on them to help make them look more faded and put a wash on as well. The ghasts look a little more course in real life, but you don’t see it in the pics. They are painted a light gray with the hands, feet and heads painted rotting flesh blended into the gray and a flesh wash over the whole thing.
“All of Michael’s look GOOD and…”
I start my skeletons by painting the bone areas Tausept Ochre, then applying a brown wash. I follow this up with a heavy dry or wet brush of the original base color (Tausept). Next I wet/dry brush on some Bleached Bone (of course!) followed by a very light drybrush of white on just the upper surfaces. You can get a bit of diversity just by varying the amount of each step. This was all done with older GW paints. I’m not sure what the current equivalents are (or the Reaper equivalents).
Looking at the other ribcages I am wondering if I use too little of the wash to bring all the details out. I will try sloshing some more on next time.
Jim: Nice touch with the decals.
Toni: those red skellies make me go “yuck” in a good way.
Dirk: I think I will borrow your way of doing the scalemail to pimp my skelly in the yellow armor. The dark recesses make it look much better.
I usually use a lot of army painter quickshade on my minis, this time the a strong tone. I first paint the whole model in base colour and then wash all areas in one go.
I use a brush instead of dipping the mini, so I have more control of where the wash goes and how much is left in certain areas. The areas I want to be left lighter are covered with less quickshade, and the recesses, especially on the armor, get more wash.
This time I painted the recesses of the armor with dark tone quickshade as a second wash, as metal armor looks more real with really dark shadows.
I usually stop at this stage, as on the skeletons, but for characters I put on highlights later.
As Antonia mentioned in the article, we want to try the GW nuln oil gloss (instead of dark tone quickshade), as it saves the shiny effect of armor. We can show our results when we finished the first test models…
On the scalemail are a lot of “shadow areas”, i.e. beneath the scales, so I recomment a heavy wash with a dark/black wash to cover all recesses. If the scales themselves get to dark you can drybrush them with the original metal color. THis way they also get back some of the “shiny” metal effect.
Dirk
The different bone colors look better in person. The Skeleton Bone is definitely the brightest.
I like the overall color scheme on Dirk’s, especially the dark metal color on the plate. All the metal looks great, though – there’s a cool axe back there. And my favorite is also the armored archer – his hooded head is the one that reminds me of Skeletor! That would be great to transplant on a beefy body.
Antonia’s bloody skeletons look like they just ripped their skin off. It’s gross but cool. The subtle green tinge on the swamp skeletons works well, especially on the one with the spear. And I love the sci-fi mod; he reminds me of DOOM.
Arjen, I like the different color schemes on each skeleton, especially the archer. It gives each of them their own little story if you wanted them to be slightly more than pure fodder.
Jim, that technique sounds great. Adding some medium brown to soften the transition from dark to bright makes a big difference. I know I still have some skeletal big bad guys to paint. I like the variety in colors you threw out there too.
Great work, everybody!
Pingback: Miniature Monday – Were Rat | Caffeineforge