
Miniature Monday – Dragon Hatchlings Part I

Even the greatest monsters start out small… let’s see what hatched on your paint stations this week!
Dirk hat a busy week, so he shows some Work in Progress this time:

Since we both would paint a set of two hatchlings we planned which colors we would use, with the goal of having as many different dragon types as possible.
Dirk went with the classical Black dragon on the first one and Golden Dragon on the second. The Black one looks rather grey yet, because Dirk didn’t use any of the black washes yet – since painting a mini black is always a challenge, he decided to layer a lot of black washes onto each other.
You can already see how he designed the base, though – it will be a swampy area, covered in gloss/water effect and tufts of grass, on which the hatchling is swooping down.
The Golden Dragon got a lava base, and Dirk is planning on doing light effects too – until then we can marvel at the pure, polished shine of the golden scales. I love how much it looks like true metal!
My dragon variants for this week were Red Dragon and Bronze Dragon:
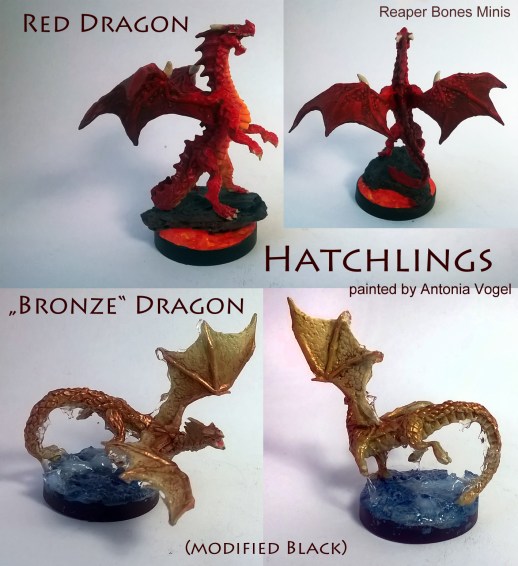
For the red one I went the classical route as depicted in 3.5’s Monster Manual, with wet-in-wet blending of reds and yellows plus some detailing and a wash. The base is a piece of bark (I plucked it out of a flower pot :p ) plus a bit of modeling paste for the lava.
Unfortunately my camera broke down, so we had to use my phone, which distorts colors, especially reds, but you get the idea. Overall, I like how it turned out.
Since the second hatchling was supposed to look like a Bronze Dragon, I cut off the mini’s horns (they are just too characteristic for D&D’s Black Dragons). I like the “swooping” pose, and since Bronze Dragons are aquatic (in D&D at least) I decided the hatchling was jumping out of the ocean and used some water effect on it, to create the illusion of splashing water.
What do you think? I find it’s always fun to experiment with surface effects like gloss, water, cracking mud etc. Let’s see what the future brings 😀
Arjen also had a busy week, so here’s another promising WiP:
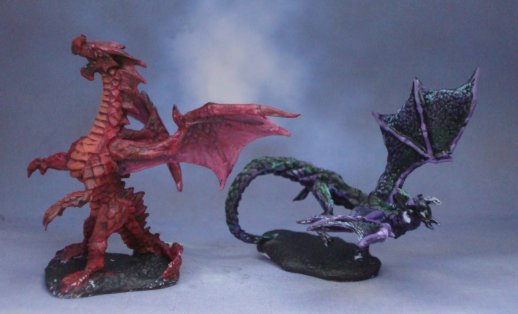
He told me he went classic with the Red One (nice dark reds, I like it!) and got experimental with Black, and I must say I love the idea: With the purples and greens it looks like the shimmering black of a beetle’s back, a great approach on painting a challenging color!
Oh, and by the way: What sort/model of camera do you use? Even if my normal one works (and I manage to get some better lighting) my camera never captures that much detail *sigh*
So, has anyone else the Dragon Hatchlings (or a similar mini) they want to show here?
Just send some pictures and we’ll update the article!
Here’s the gallery of today’s pictures:


Coming next:
04/25/16 “Ankheg“ classical D&D worm monster (Bones II Core Set)
Want to participate in next week’s post? Email the pictures of your minis until 04/10/16 to
05/02/16 “Sharkman” (Bones II Core Set)
05/09/16 “Mister Bones” (Bones II Core Set)
05/16/16 Big Monster Part I: “Chimera” Preparations & Basic Colors (Bones II Core Set)
05/23/16 Big Monster Part II: “Chimera” The Final Result (Bones II Core Set)
05/30/16 “Bloodmane, Gnoll Warrior” (Bones II Core Set)
06/06/16 Dragon Hatchlings Part II: “Blue“ and “Green“ (Bones II Core Set)
(Wishes? Ideas? Tell us via email or in the comments!)

Regarding the camera: I use an old model Sony cybershot, something like 150 euros, but it has a Zeiss lens. The lens is the only thing that really makes a difference in cameras nowadays.
Before you buy a new camera though, realize that lighting is much more important. First, try using a darker background, as your white background is effectively blinding the camera: it will take a short shutter time, sucking in too little of the light coming from the mini. More light from the mini is more detail. Take grey if you want a neutral background and make sure the surface is not sort of shiny.
Second, well, more light is more detail. I always take my lightbox outside as no amount of lamps can beat the real thing. It must be indirect light, hence the lightbox. You would be surprised to see how dirt cheap my box is: just a cardboard box with 4 big holes in it of which 3 are covered with white paper.
Third: experiment. For instance, for my camera the optimum zoom is 2.4x: if I use more, it will not focus properly. Also, I tried several backgrounds and this blue-grey one that someone posted on this site (!) years ago works quite well for me.
Hey Arjen,
thanks for the info. We already have a light box, but the non-white background is a nice idea, esp. since my camera doesn’t work well if there’s not enough light.(and in our region we don’t have sunshine that often *sigh*).
For all painters who are thinking about this week’s mini, the beetle-worm-monster, and don’t know where to go, here are some tropical beetles for inspiration:
Just get your paints out and have fun!