
Miniature Monday – Gauth Pt.2
At last, the final chapter of Gauth is here. Read on to see this mighty monsters in all their glory. We can present at least 3 of the 5 chromatic dragons.
(posted by Dirk)
Hello everybody, I’m back and happy to be alive and kicking. I still have to cope with some problems, but I was very lucky that I only had a minor stroke. Thanks for all the kind wishes, I’m on my way back to my old health. I even painted my first model (a character model for a friend as a present).
Sorry that you had to wait for so long for the conclusion of this project, the vampires already wait for their turn and are thirsty for blood. We try to let them out next week.
First, Timothy send us not one, but two dragons!
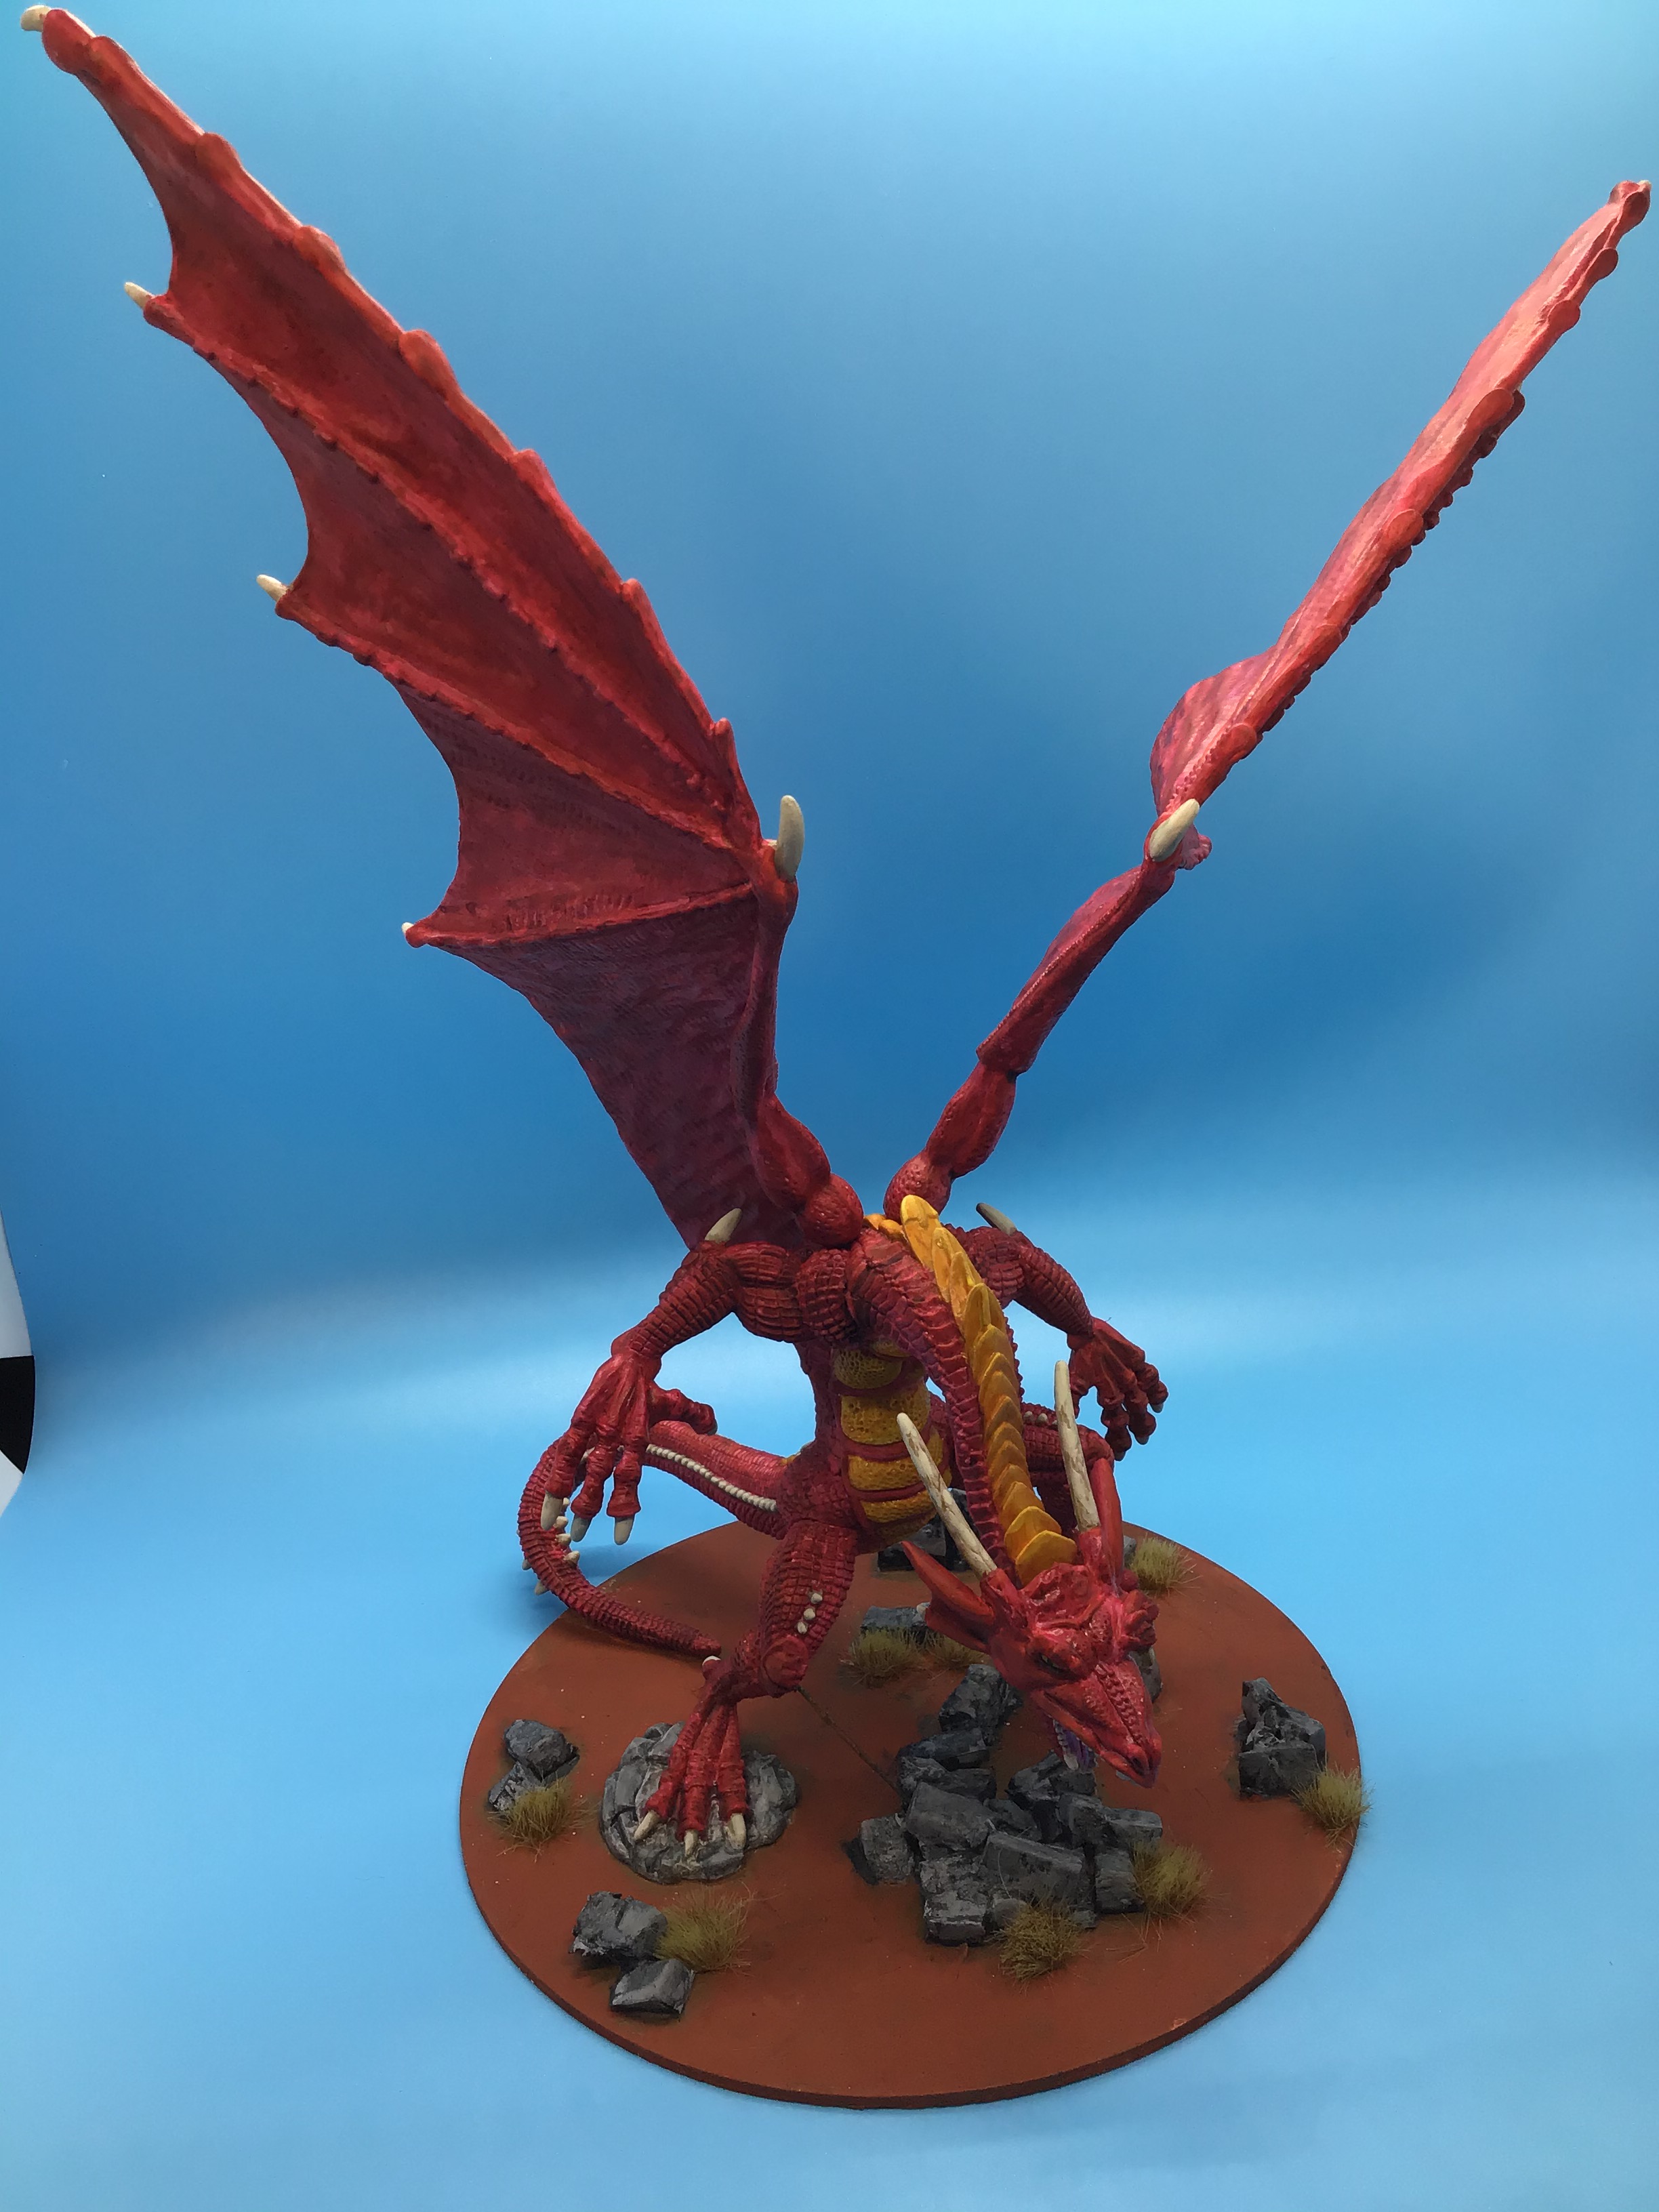

He has painted the bones version (red) as well as the metal version (dark blue). Here is what he said: “I had to straighten his parts and glued his tail down and added a paper clip to his leg for stabilization. Mounted on a wood base with some styrofoam bits painted like rubble.
I had the metal version for years and had not painted it so I decided to paint it for comparison. The gaps were bad but it doesn’t have to be bent or supported. Box art was blue so I went with it. Wooden base, flock and foam rubble.”
Thanks for sharing this comparison of metal and bones. Now that they are painted, would you say there is a big difference in quality of the sculpt, or does the bones version live up to it’s predecessor?
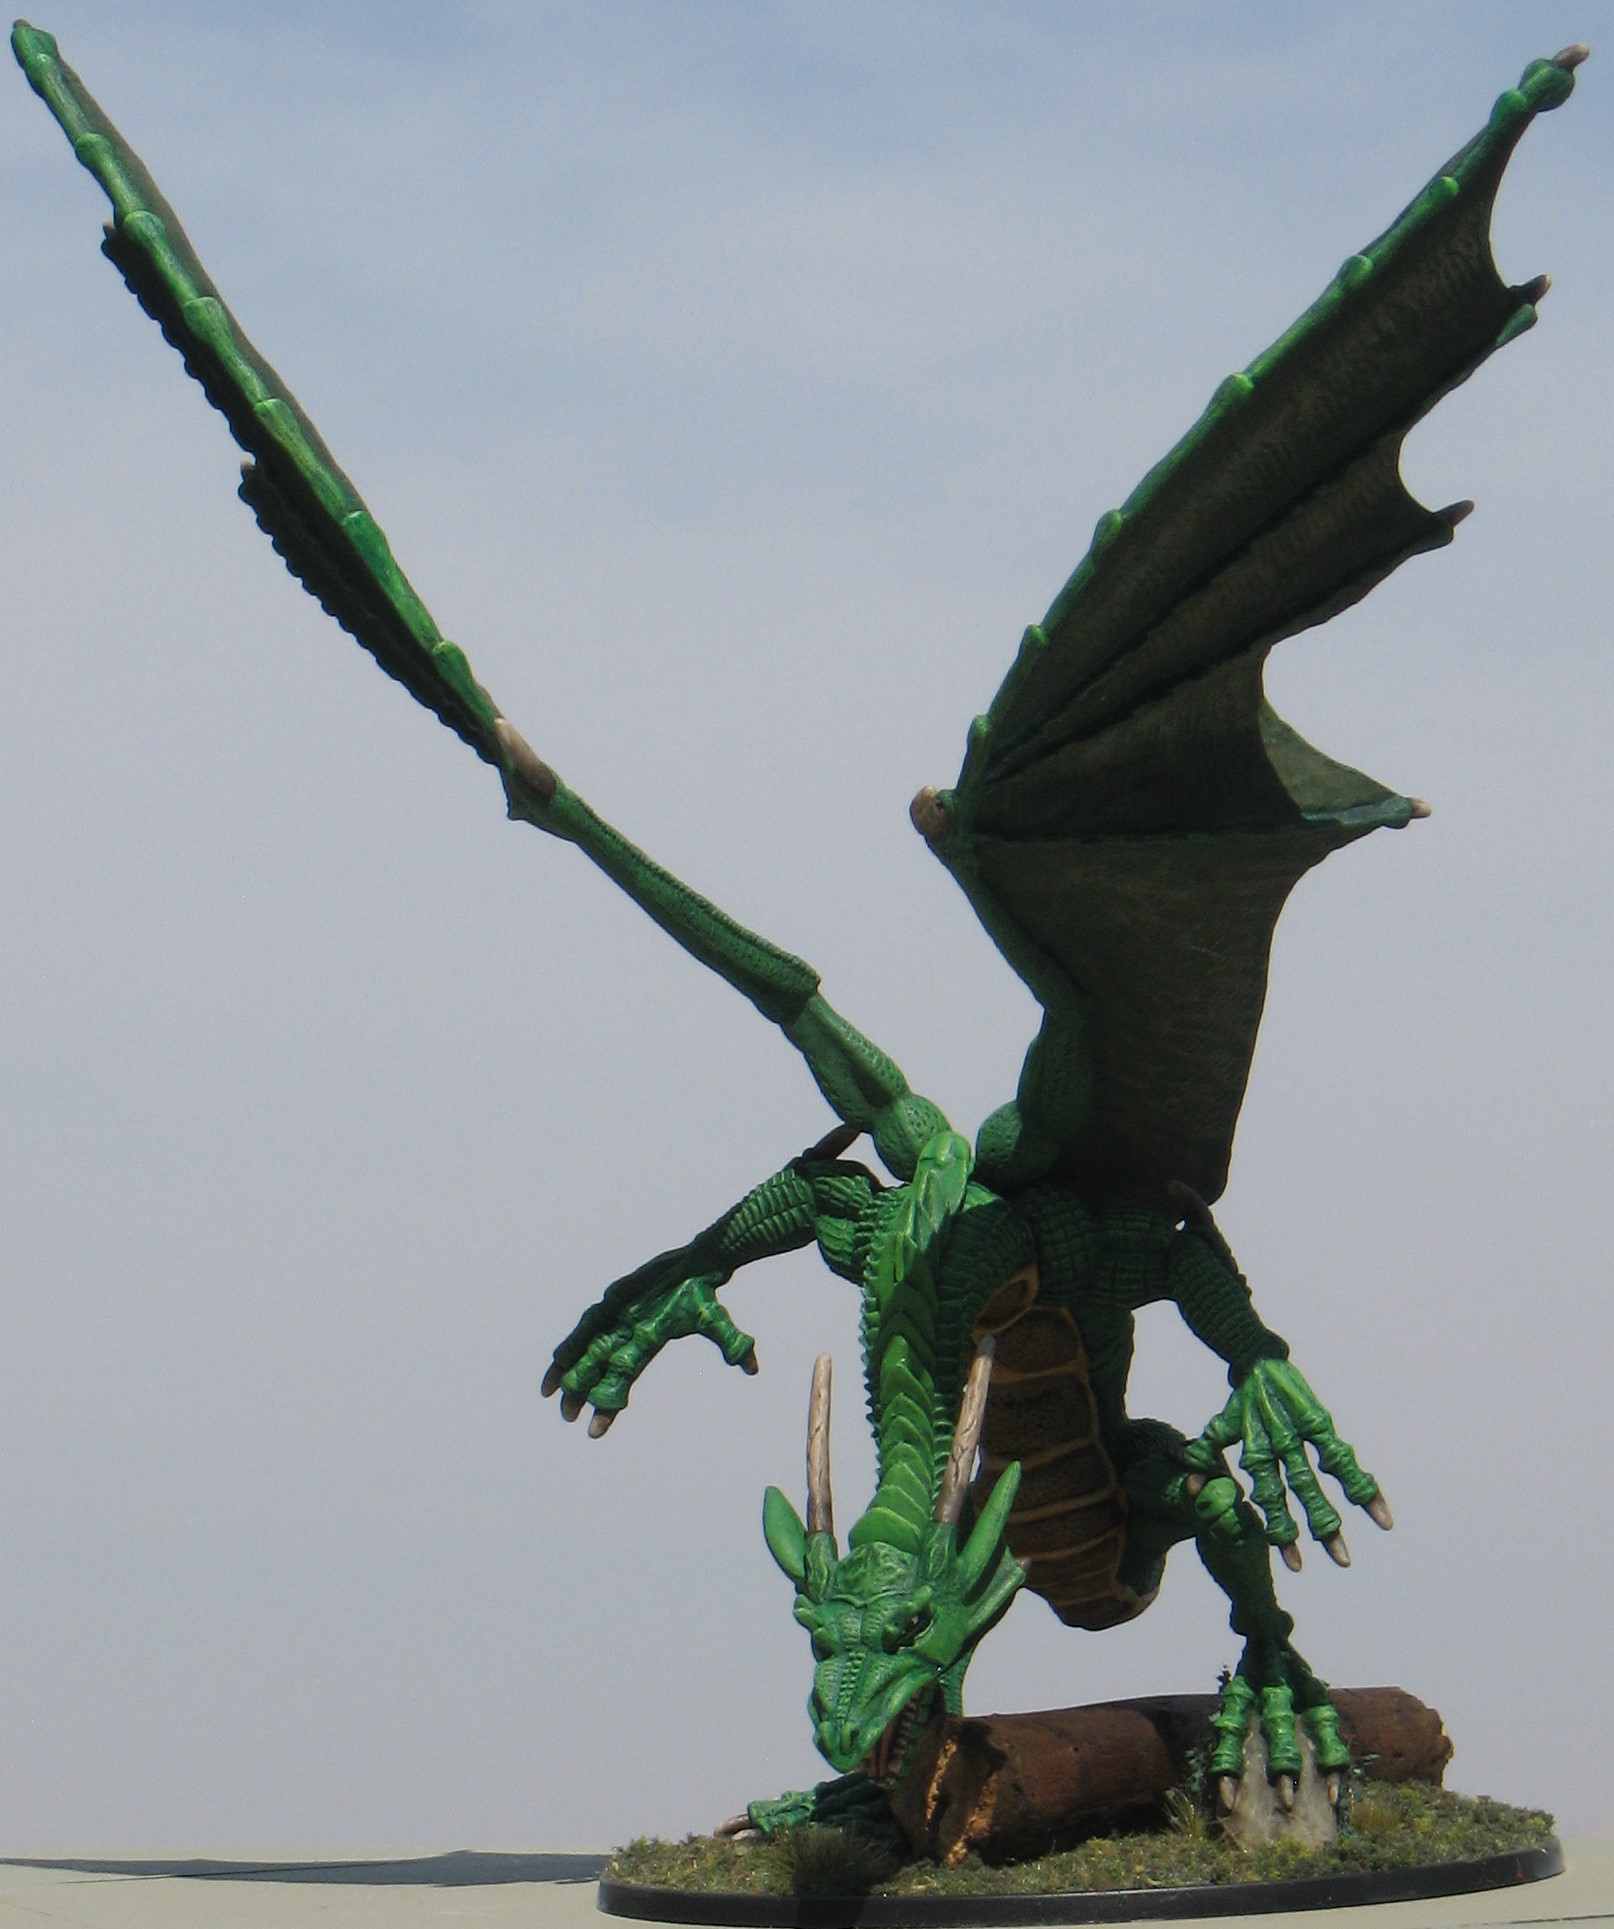
We’ve seen two stages of Michael’s dragon already. Here is the finished model.
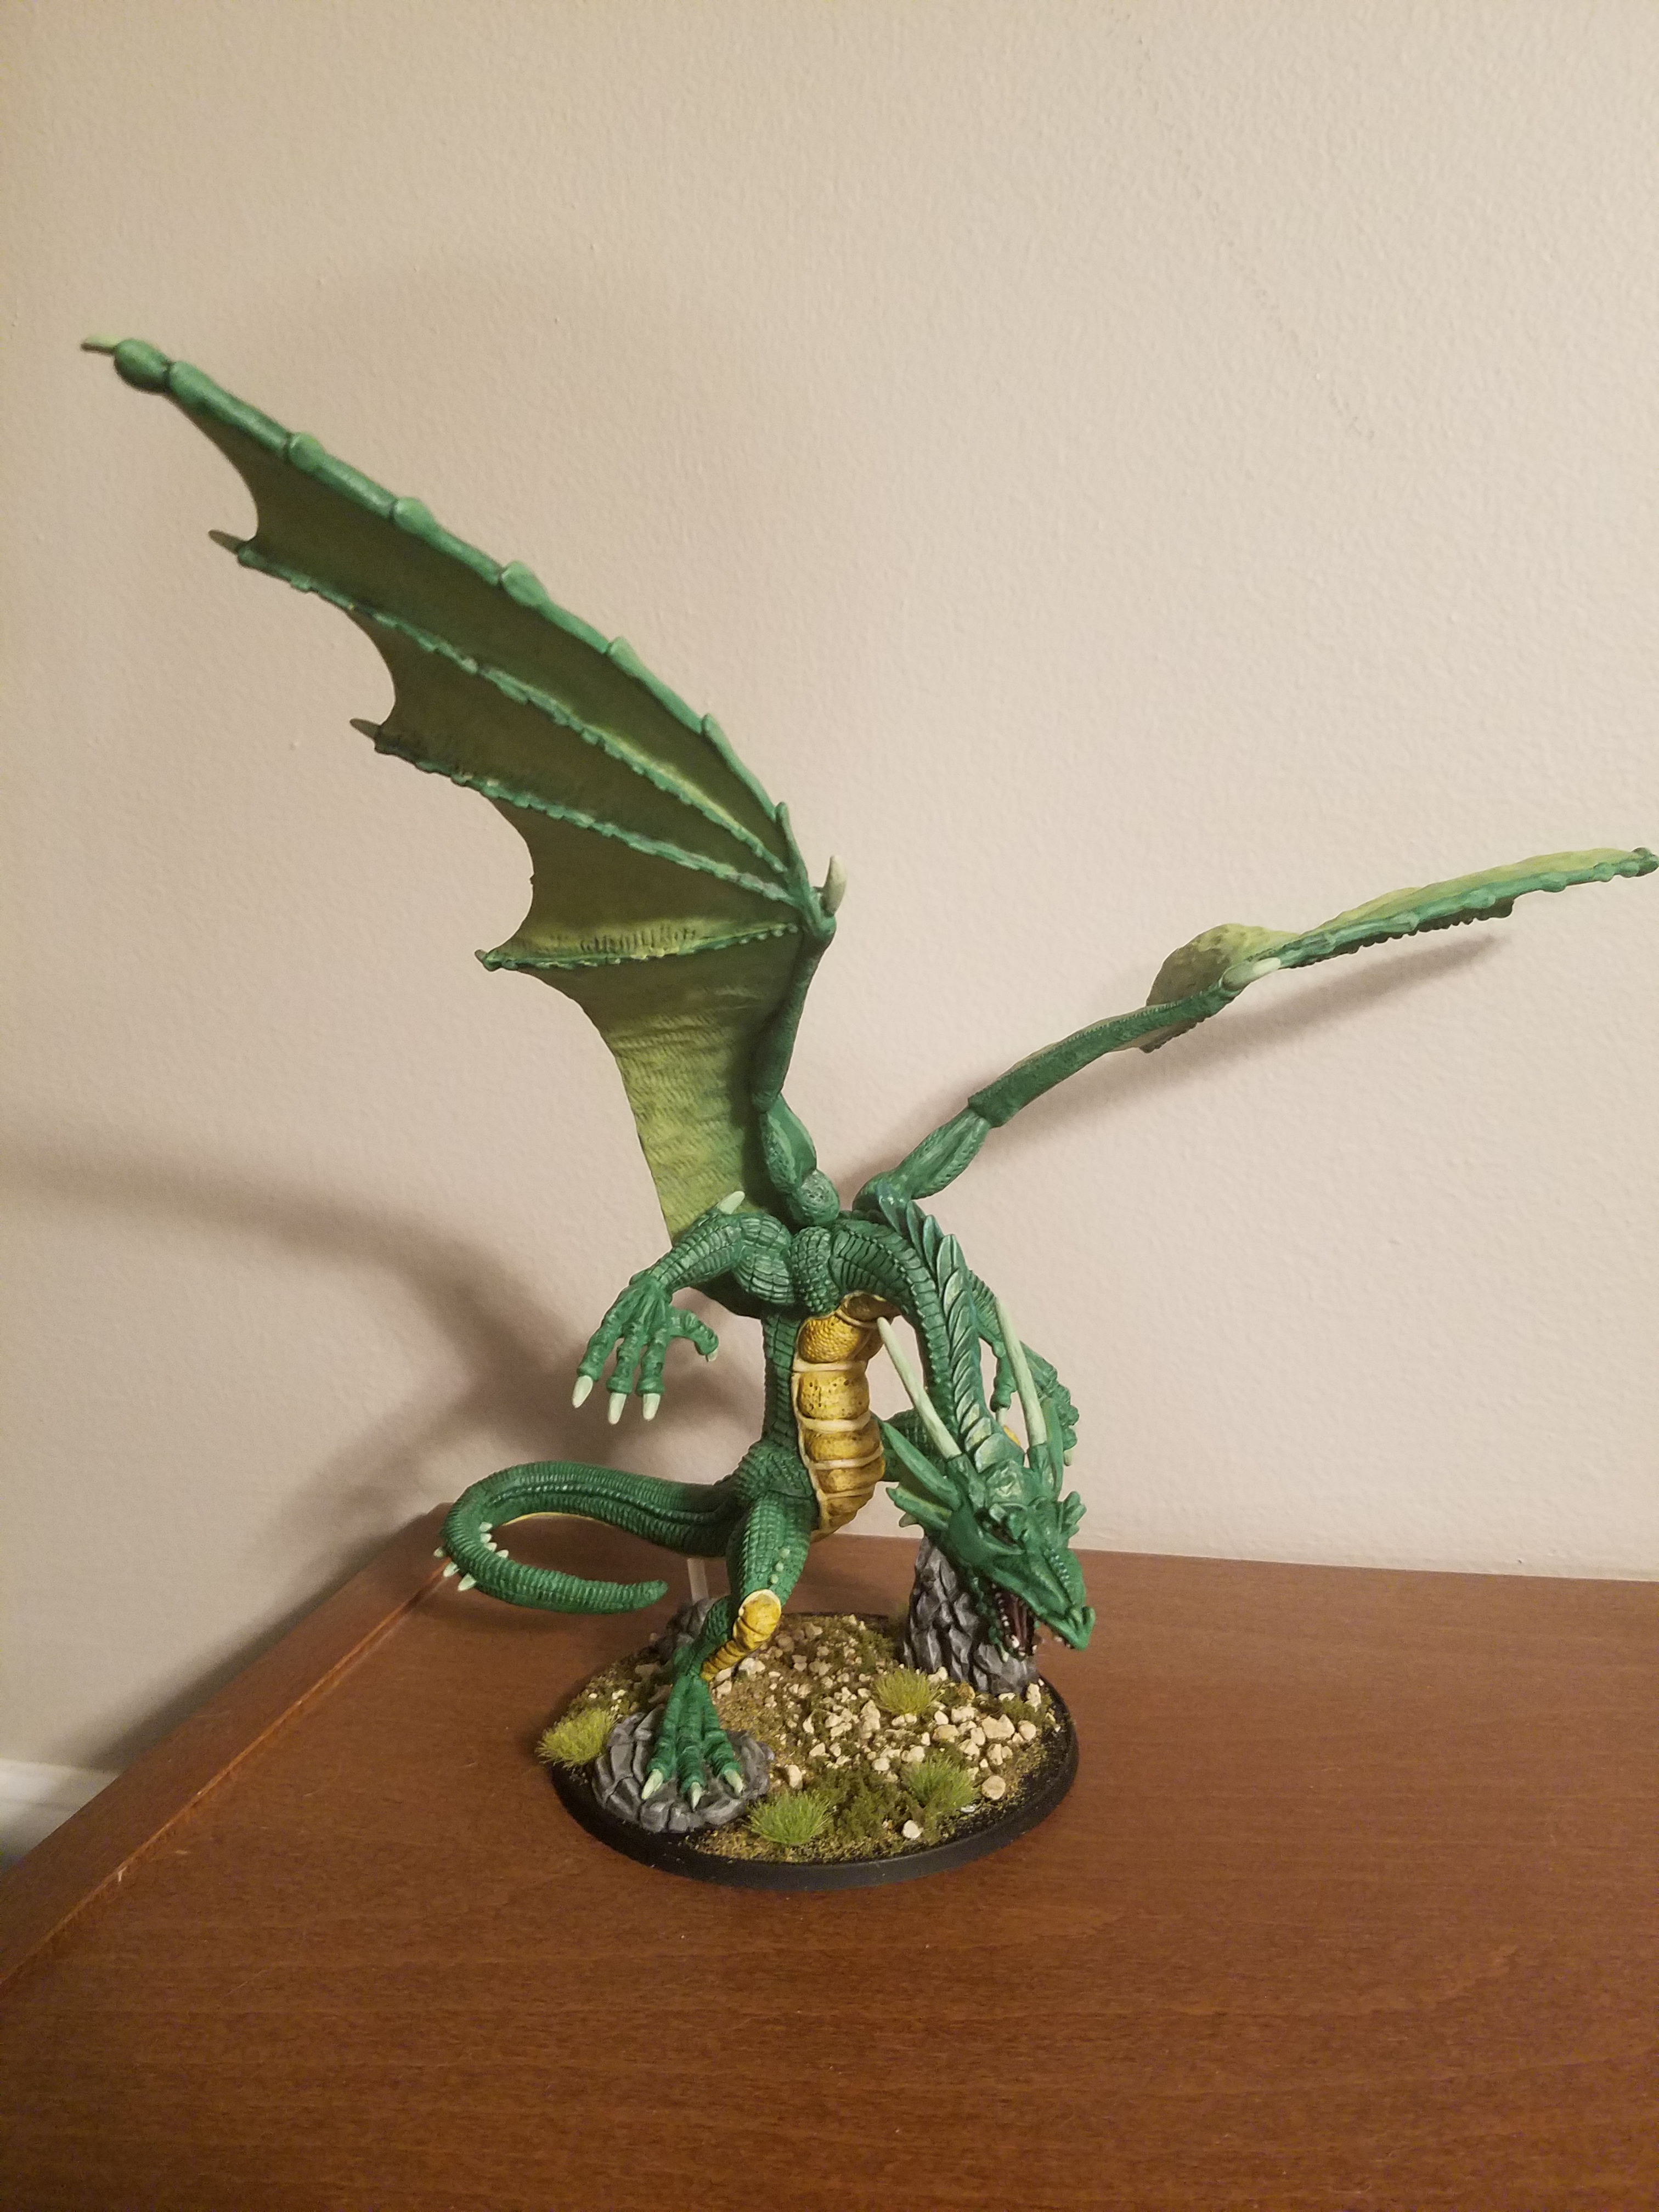

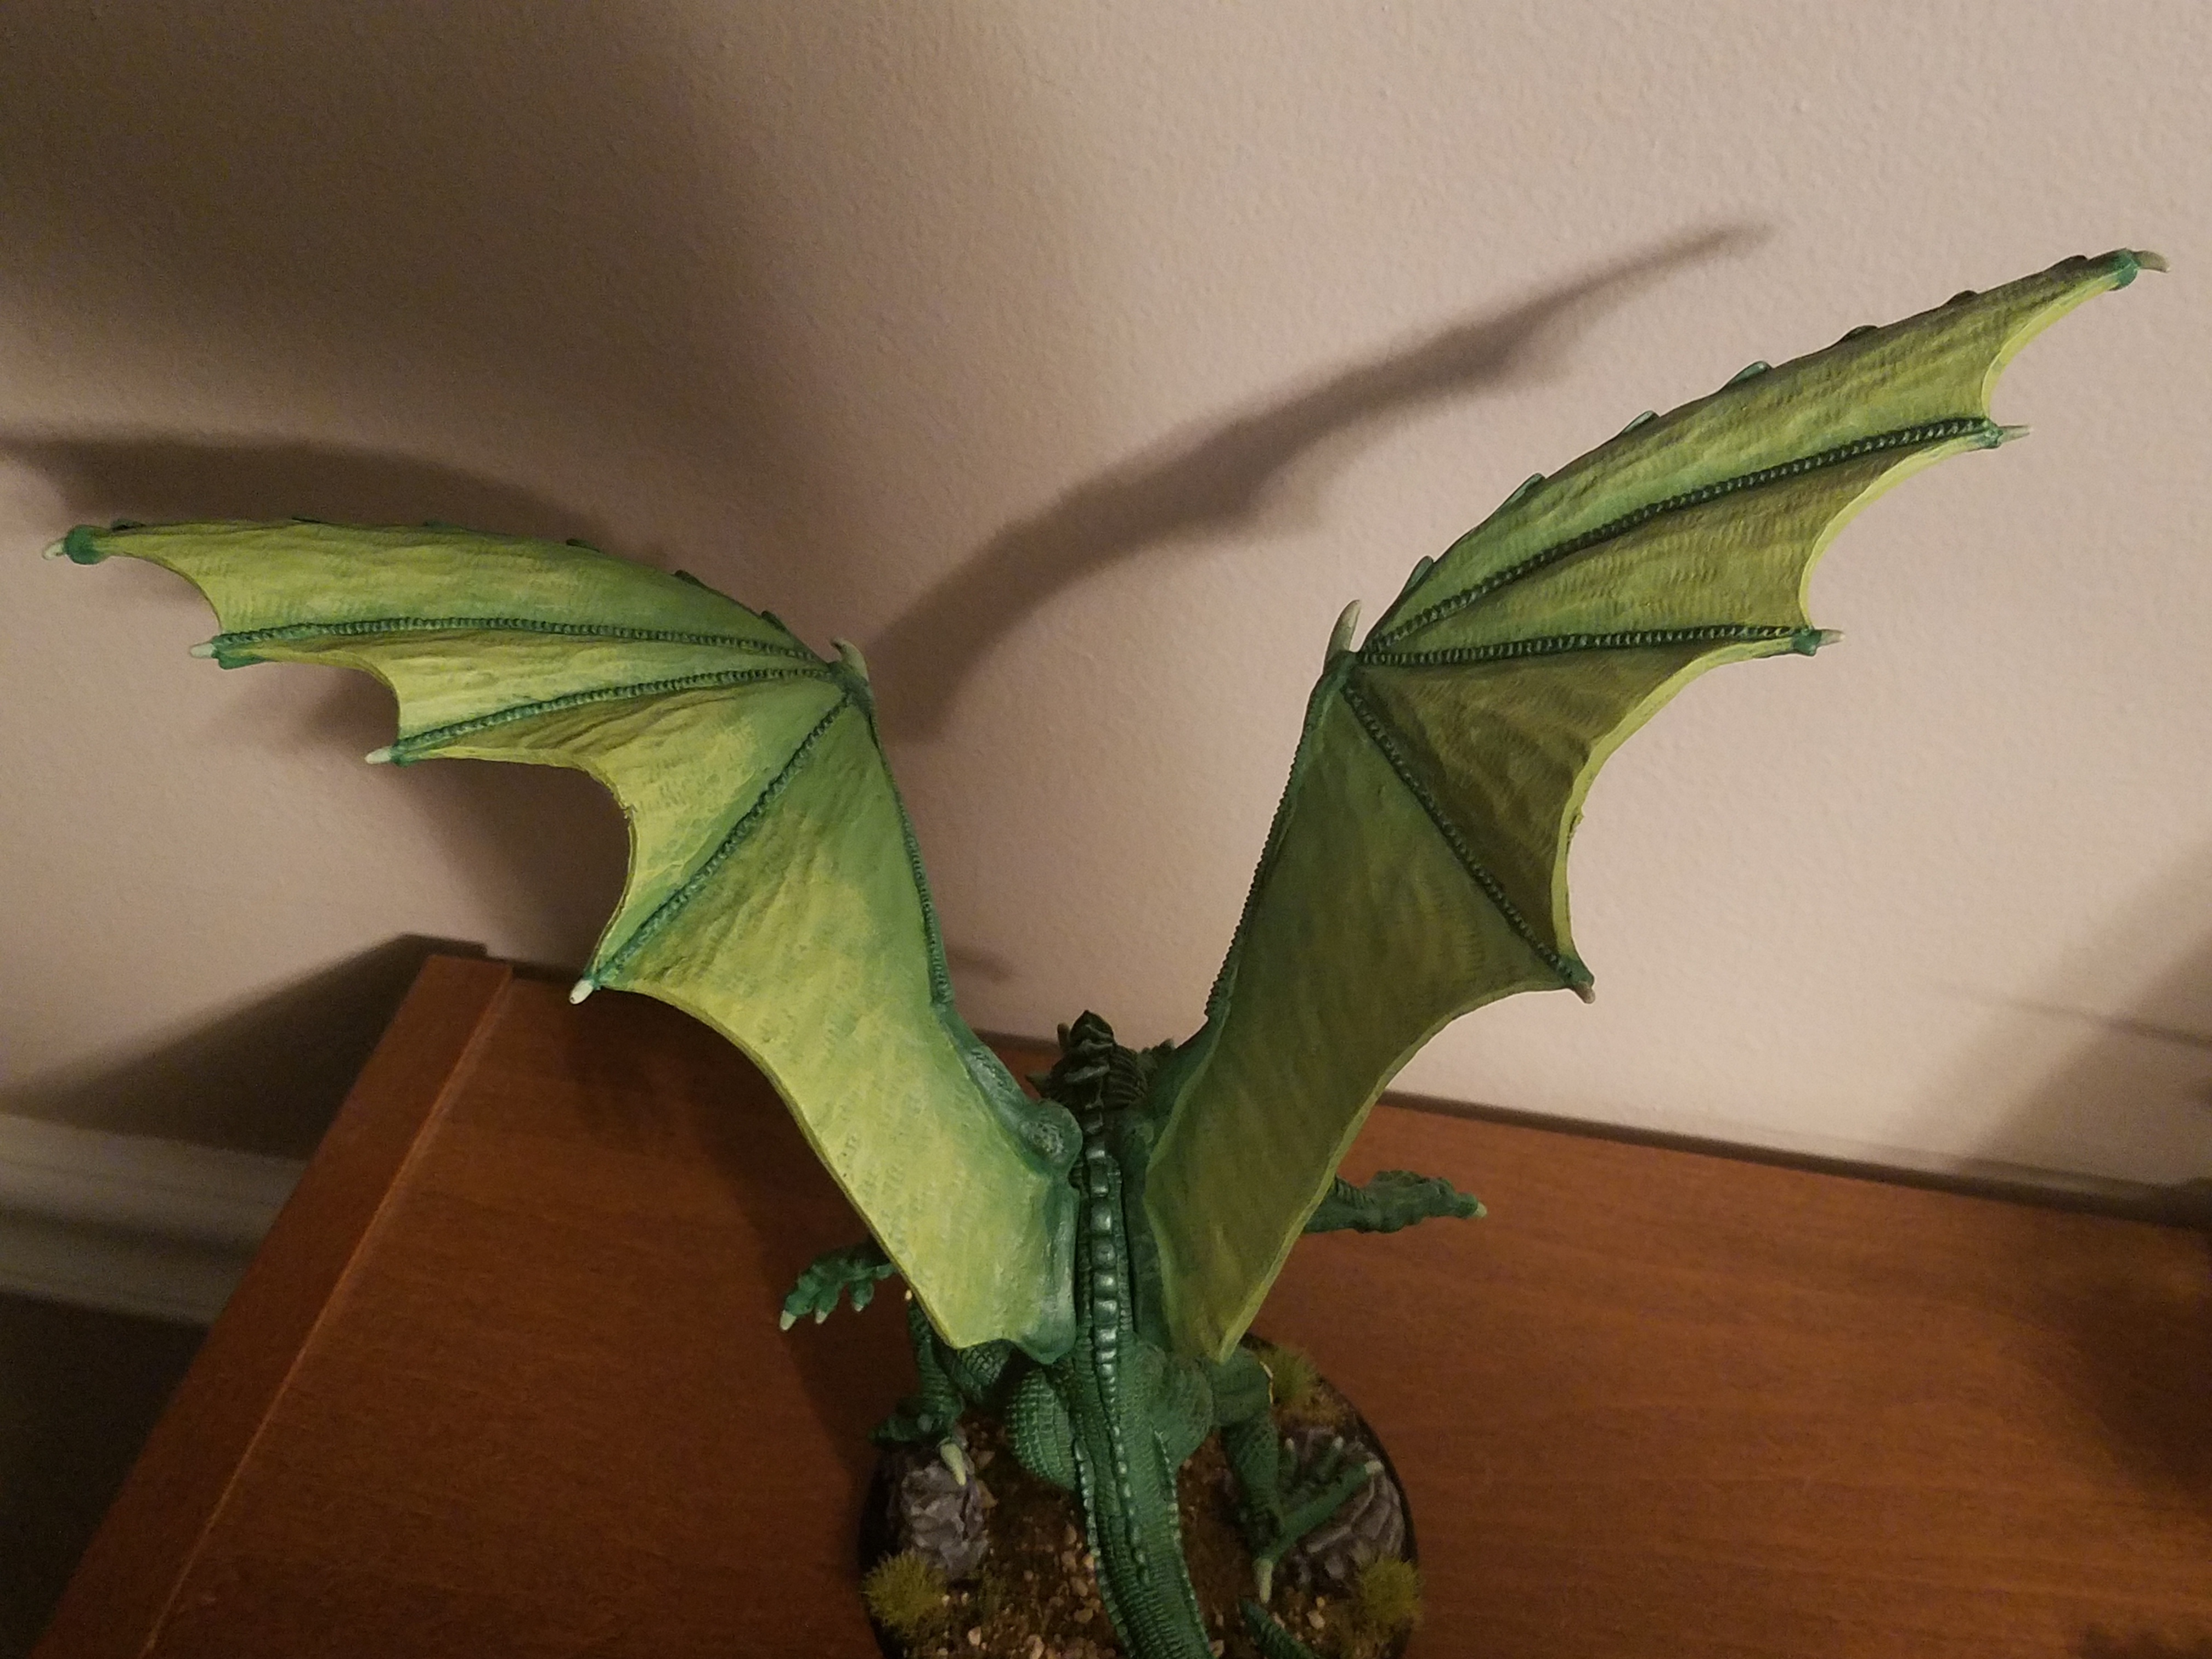
He said: “I think Gauth’s base turned out pretty well. I included a shot of him with the Dragons Don’t Share ruins, some Dwarven Forge trees, and Calvert Greenguard (the Ivy Crown Knight mini I’m using as a PC).”
Let’s hope he survives the encounter with such a big dragon 😉 Was your dragon stable at last, or did you have more problems? How did it’s wings behave?
Jim finally assembled his dragon.

“Here he (she?) is in all his glory, Ha, ha! Not much to add other than I’m happy with the way he came out for tabletop use. Not spectacular but pretty good. The wings seem to have drooped just enough to look good without causing problems. I’m considering a bit more detail on the back side somewhere as he’s a little plain, but then again, I may not do any more. The base came out well with only two criticisms on my part: The base doesn’t give quite as much of a forested feel as I would have liked and I was trying for the effect that Gauth is crashing down his prey and has just knocked over/broken that tree. Not a big problem, but I think the log looks a bit too much like it has been lying there for a while and not freshly felled.”
Can you share your experience how it was to assemble the painted parts? Did you have to cover a lot of gaps, or was it easy to do?
This week’s gallery:
Coming next:
10/19/20 Bones IV (Core Set) Movie night Part II: Paint Classic Horror Monsters (Vampires, No. 132 and 133)
Want to participate in the next post? Email the pictures of your minis until Friday 10/16/20 to
MondayMiniature@fantasymail.de (It’s a .de domain, in case emails are bouncing)
–> Attention: The submission date for photos is about three days before publishing date, to give us a bit of time to actually write about your pictures
This way you’ll have two weeks/one weekend to paint, and we have one weekend to write (which is the only time of the week where we (might, *sigh*) have some open minutes).
You can of course send in pics later, but to take out a bit of the stress (most pics arrive here rather last minute) please consider the three day deadline. Later pics will still show up in an update
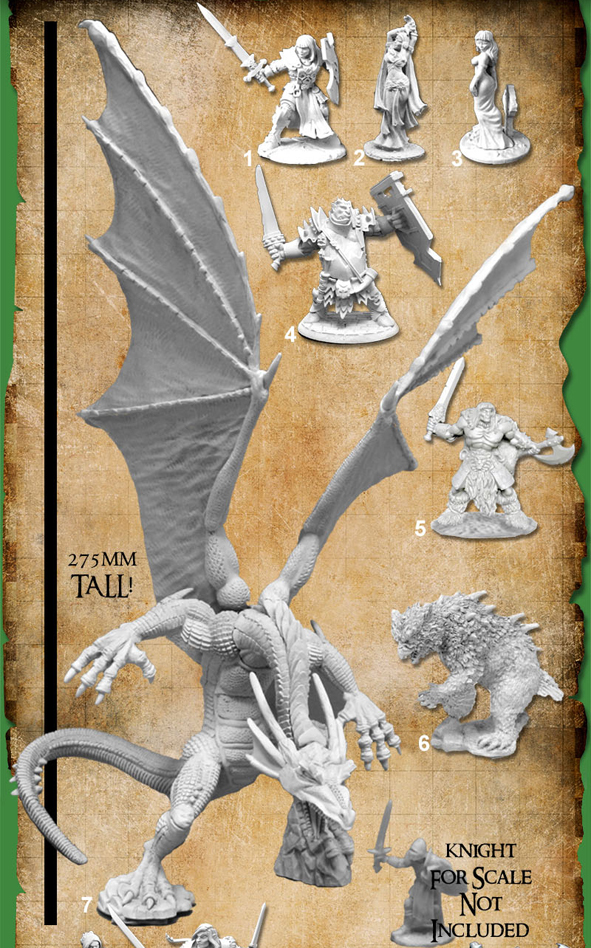
Here is the link to Reaper’s graphic with all the core pieces, but it’s one and veeeery long picture so be prepared for some scrolling. On the other hand it has separate numbers for most of the pieces. I will add individual shop links as soon as they appear!
Here is the underdark Add-on.
10/26/20 Bones IV (Core Set) Bedeviled: Devils/Demons (Nos. 72, 73 and/or 74 on graphic)
11/09/20 Bones IV (Core Set) Movie night Part III: Paint Classic Horror Monsters (Victor’s Creatures, No. 134 and 135)

Hope everyone is doing well! While I’ve been trying to get some painting done each week, I miss sharing the pics and seeing everyone’s work.
Timothy, it’s really nifty that you sent two in. How did the metal wings behave? I think I like the blue a bit better; it’s a darker blue than a lot of the modern blue dragon art, which to me captures the old-school spirit of this model. Also, I like how you didn’t paint them in the exact same way in terms of where the accent colors are.
Jim’s has some nice highlights on the face and scales. I’m trying to figure out how to get the log to make the effect you wanted. Possibly if it was off to the side, or maybe having splintered debris as well would help.
Looks like mine has the droopiest wings, but no big deal. This guy and those ruins pieces were also my first time using a spray sealant. I usually just use Reaper brush-on sealant, but bought some cans of Testor’s Dullcote for these big pieces. I’ve been using it for other stuff, though, as I recently had an experience where my sealant stripped off the dry brushing I had done (this was on Dungeons and Lasers hard plastic, not Bones material). So far, I like it, but I don’t have a garage or basement, so I’m at the mercy of good weather conditions to spray. Luckily, this is the best time of year for that, so I’ve been trying to be productive!
Thanks! Your comments on the base are correct. Once I got the dragon and the big log/trunk on, there really wasn’t much room! I think the only real solution would have been to use a much larger base and create more of a diorama rather than a gaming piece. Live and learn!
Glad you’re still with us, Dirk!
Timothy – Nice pair of dragons. The red is classic and the darker blue is well done. I like the contrasting color along the neck & tail. I was thinking about doing this and now I have a reason to go back add a little more color!
Michael – Your green (and the base) came out well especially the color gradation on the wings. Another classic!
Mine is fairly standard except that I went for a more earthy/olive color on the wing membranes. The idea being that it would help the dragon blend in when on the ground perhaps waiting to ambush prey. I generally find it easier to work on sub-assemblies of a large mini until perhaps 75% done (roughly) and then finish putting it together before ending with the final 25% of the painting. I didn’t find the gaps to be too big, but once I got a bit of gap filling super glue followed by some of my shadow green they are hardly noticeable.