
Monday Miniatures: Red Dragon (Guest starting Dirk and Antonia)
![89001_w_1[1]](https://caffeineforge.com/wp-content/uploads/2015/04/89001_w_11.jpg)
This week we present not only a flight of half finished dragons, but a rare treat. Below is a tutorial on how to do a particularly beautiful but not-quite-as-complicated-as-it-seems effect (but-still-pretty-complicated.)
This week’s post is not to be missed.

I’m going for a classic color scheme. It should be noted that even base coating a model this big takes real time.
 Arjen noted in his email that the head will take as long to paint as an average size mini. He didn’t have the model that we are using, so he is painting a different dragon red. Look how he is showing off with the details already.
 Antonia spent her week modeling the base. Which is basically showing off. I can’t wait to see how this one turns out.
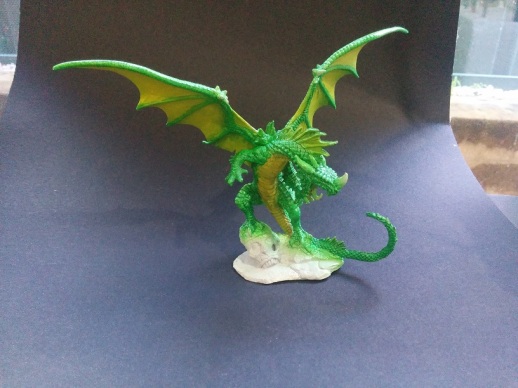
Luke is going green for a change of pace. Even if Sprite doesn’t sponsor it, it will still make waves. What color do you plan on painting the horns to offset the brightness?
 Brian is also going for a classic color scheme, and well on his way to finishing by the looks of it.
 David M’s will be truly beautiful if he can keep up that level of detail. Only 4,000 more scales to go!
Also last week I promised a certain tutorial that I forgot to post. Spread the link to this one around to your friends – it is not to be missed.
How to make energy, fire and blood add-ons for minis using water effect
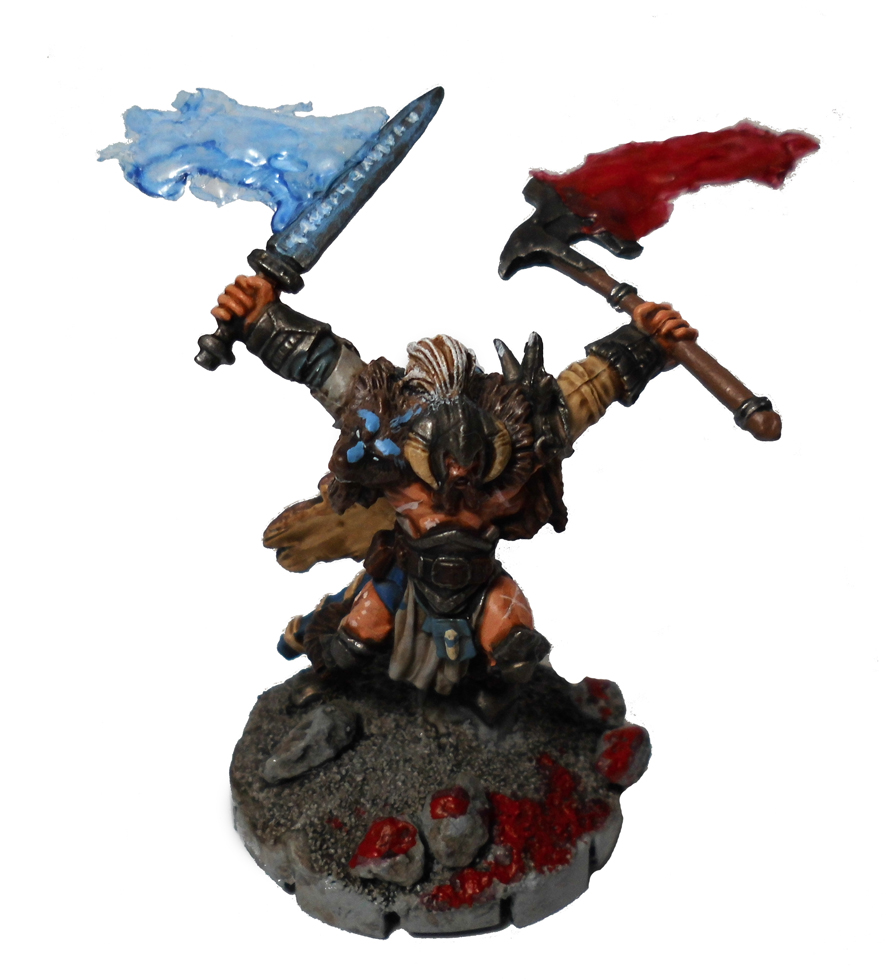
Did you ever think about an impressive flaming sword for a character mini or fierce bloodspatter for the evil overlord hacking through his enemies, but didn’t find the right miniature?
Why don’t you make it yourself? I was asked to show how I made such effects as on this barbarian chieftain I painted for monday miniature, and I’m glad to give you this step-by-step tutorial how I create effects like this. If you are interested, read on…
The technique is based on the idea of my wife Antonia to use water effect as translucent basis for heat-, energy- or liquid effects sculpted on a miniature. In this tutorial we show how to make a flaming sword as an example for this method.
First, here are the tools we used to get things done.

The flames are made from water effect. We used the one from vallejo, but every pasty (not-liquid) one should do.
You will need a palette (i.e. some smooth surface) to sculpt your flames on and a clay shaper, paintbrush or a similar tool to put the water effect on the palette.
A scalpel or modelling knive comes in handy to remove the finished flames from the palette.
The basic flame shape
The first step is to sculpt the basic flame shape on the palette. Use your tool to pick up some water effect from the can and apply it on the palette in the desired form.

Think about how the blade is positioned and how you want the flames to „flow“. I chose to let the flames go straight up, as the blade is immobile. So I sculpted the base of the flames as a straight line, following the blade edge. The flames went up in an angle to this, so they have the form I wanted. Take care to make the layer thick enough, if it is too thin, it will break when you remove the flames from the palette. If it seems too thin after first go, just add some more layers later!
When you are happy with the result, let it dry. To quicken the process, put the palette on a radiator or other heat source.
After the water effect was dried completely, I applied a second layer to strengthen the structure.
Keep adding layers and dry them until you are satisfied with the result.
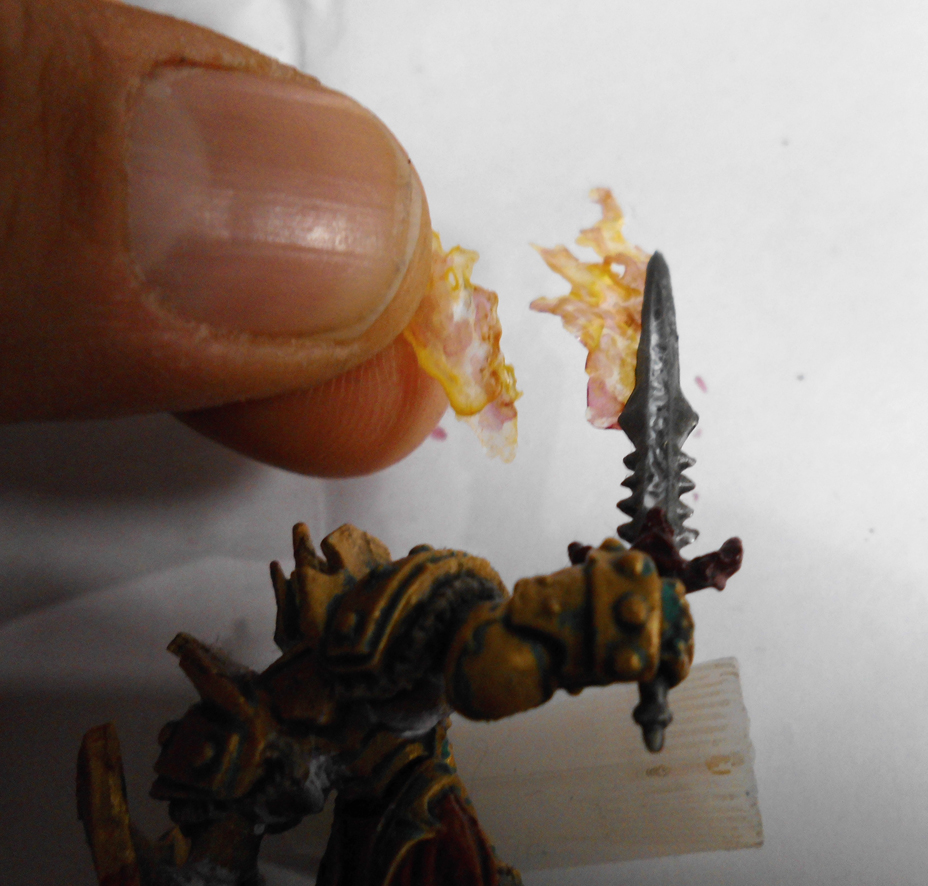
As I sculpt the flames on a palette, the other side will be flat. To compensate for this and to give the flames a better „grip“ on the blade, I made a mirror-inverted second flame, a little bit smaller then the first (as I was sure that I couldn’t match the outer edge of the flames).
Removing the sculpt
The next step was to remove the flames from the palette. I used the scalpel to scrape between the palette and the flames. Be careful not to destroy the flames.

Painting
Use an adequate surface to paint the flames, a white one is best to see the real colour. I painted the water effect with a yellow and a red wash to get real flames, but other possibilities exist. There will be some examples later.

Applying the flame to the mini
I put a little bit of super glue on the back side of the long edge of the flames and glued it onto the edge of the blade, positioning it as I desired.

After that I glued the inverted flame on the backside, sandwiching the blade in between.
And here we go: a flaming blade!

The single steps don’t need much time, but there are several drying breaks. But hey, that’s a way to kill the time while the paint on your mini dries! .
Other uses
There are several other effects that you can create with this technique, like glowing energy from a magic sword or trailing blood on the barbarian, or ghostly fire like on this undead.

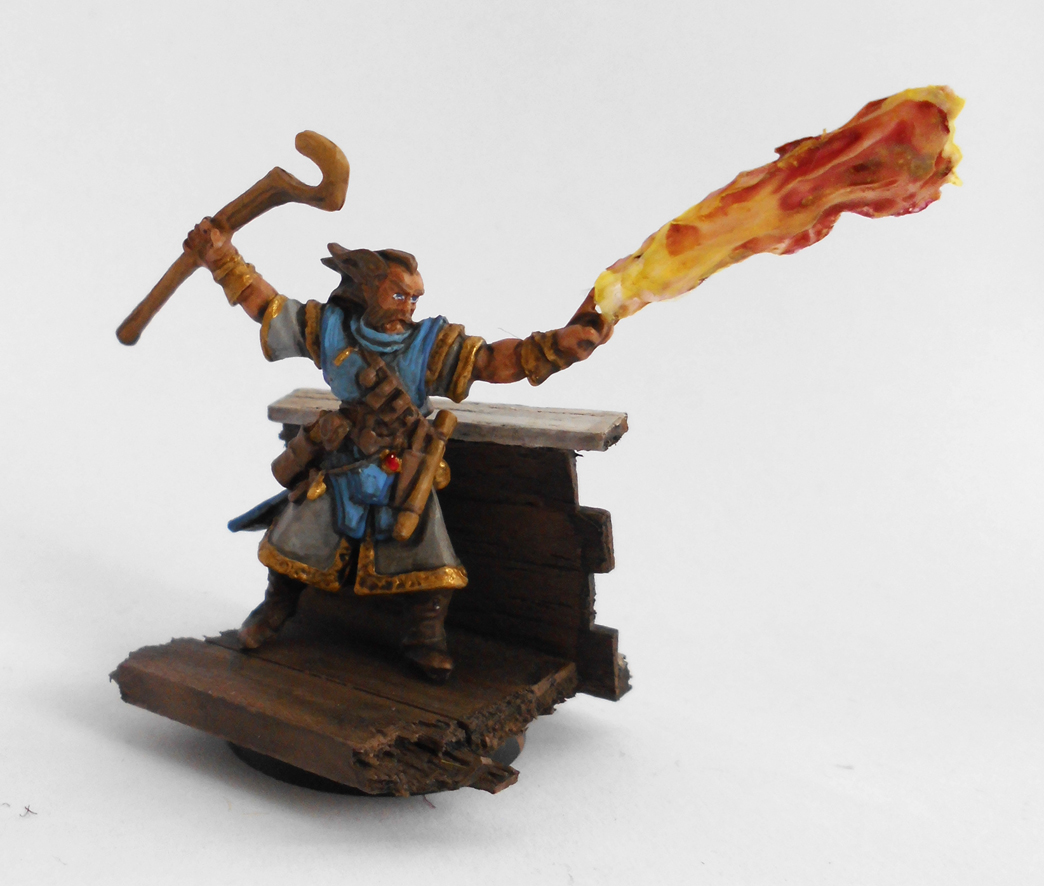
You can try other forms to create interesting effects, like this flame throwing wizard.
You can even use water effect to make… water! (Go figure 😉 ) like Antonia did on this storm giant. A little bit of red was added so that it seems the blood of the kraken intermingles with the water.

Other tools
If you don’t find the same tools, you could replace some with other ones.
The clay shaper could easily replaced by a tooth pick or a brush. You just need some pointy thing to get the water effect out of the can and onto the palette (remember to clean your brush thoroughly if you use one, though. Otherwise the brush will become one solid piece of rubbery stuff…. which you *could* use as clay shaper, I suppose. Circle of life, or something 😀 )
For the scalpel you can use any thin and sharp blade, the only important thing is that you can get carefully under the applied water effect.
Even the water effect can be substituted! You just need a translucent medium that hardens after drying. I tried it out with simple clear glue, and the results were satisfying, although the water effect is more paste-like and therefore adds more structure. Perhaps you could also use acrylic medium (a paste painters use to add structure and texture to acrylic paintings).
So grab your mini and try it out! Let us know if this tutorial was helpful for you, or even show us your results, we would love to see them.
Dirk and Antonia Vogel
5/3/15 – Red Dragon – Week 2 – Now’s your chance to really show off. You’ve had 2 weeks and a gorgeous sculpt – blow me away.
5/10/15 – Oswald the Overladen
5/17/15 – Gruff Grimeclever
5/24/15 – Novacorp Sgt
5/31/15 – Autumn Bronzeleaf
6/7/15 – Elladan, Elf Ranger
6/14/15 – Novacorp Speedpaint – See how fast you can paint a few of the sergeants loyal men
6/21/15 – Seltyiel, Iconic Mage
6/28/15 Horace ‘Action’ Jackson
7/5/15 – Jabberwock – Week 1
7/12/15 – Jabberwock – Week 2
Want to participate in next week’s post? Email your pictures of your mini to caffeineforge@gmail.com

The green dragon doesn’t look quite so bright in the flesh, although I am going for quiet a bright colour scheme. I’m planning planning on doing a classic ivory or off-white colour for the horns. And as an Australian I see this dragon as less Sprite themed and more of an Aussie Green and Gold!
More importantly than that though, David M’s scales look amazing! I can’t wait to see the whole thing completed!
Also, the tutorial from Team Vogel is great! Definitely something I will have to try out out sometime! Thanks for writing it up!
I actually really like how bright it is. It definitely stands out though.
What does Aussie Green and Gold refer to? Forgive my ignorance, please and educate me.
http://en.wikipedia.org/wiki/National_colours_of_Australia
That’s an inspired use of water effect, Dirk! Thanks for sharing!
Your welcome! I’m glad we finally finished the tutorial and I hope it helps many people in making some dramatic effects. Perhaps someone finds another inovative use for “usual” tools and materials…
I am curious: David W and Luke start with a midtone base color: are you guys planning on using a dark wash?
I assume you mean me, when you write “David W”, as I am the only David this time around..
And in that case; my base color is black. I have so far not used any washes as it will dim the yellow color, which is not something I want. I wanted the high contrast between the base and the highlights.
David W is our host (uppermost dragon). I did notice that your dragon is painted in the classic way ( from dark to light) like mine will be, when finished. As I understand this way of painting, I am curious about the dragons that do not seem to follow that pattern.
Ah, fair enough! 🙂 Totally missed that….
A quick question if anyone knows. How difficult would it be to use these water effects to create a translucent dragon out of Kaladrax the undead dragon? Basically my writing group challenged me to use a crystalline dragon in a story and i am having a hard time visualizing it in my head…
If you had a mould, you could fill it with water effect instead of pewter or lead or whatever, I think. But it should be a soft form (like silicon) and the water effect needs a lot time to dry. I think it’s best to fill it in layers with enough time to dryy for each layer.
And remember that miniatures are normally copyright protected, so you can only make a mould with permission from the manufacturer or from an own original design.
Perhaps you could just try to search the internet for crystal or glas dragon. If you just need an inspiration for your imagination, perhaps you find something…
Breaking news: Bones 3 starring Tiamat, June 8th!
I have some pictures of the green from the con if you’re interested in seeing him. 😉
We’ll need 12 weeks to paint it!
I love these! I got a WIP shot, but that’s all right now unfortunately…. Reapercon took all my time and attention. Y’all keep up the amazing work!
Pingback: Miniature Monday – Ape Demon | Caffeineforge